Graphics Agent for Windows
Administrators' Guide
This content has been translated by a Machine Translation (MT) service without human intervention. HP Inc. is not liable for any inaccuracies.
Accurate translation requires detailed understanding and knowledge of both languages which cannot today be achieved automatically, therefore MT translations are likely to be imperfect. This MT service is provided by Microsoft®️ Translator. HP Inc. is not liable for any inaccuracies. The automated translation results are approximation of the original, and therefore should not be used with customer-facing materials. Translation quality and accuracy will vary, depending on the quality of the original text and on the choice of target language. Any reliance you place on the results is at your own risk.
NVIDIA GRID vGPU 用の複数のモニターの構成
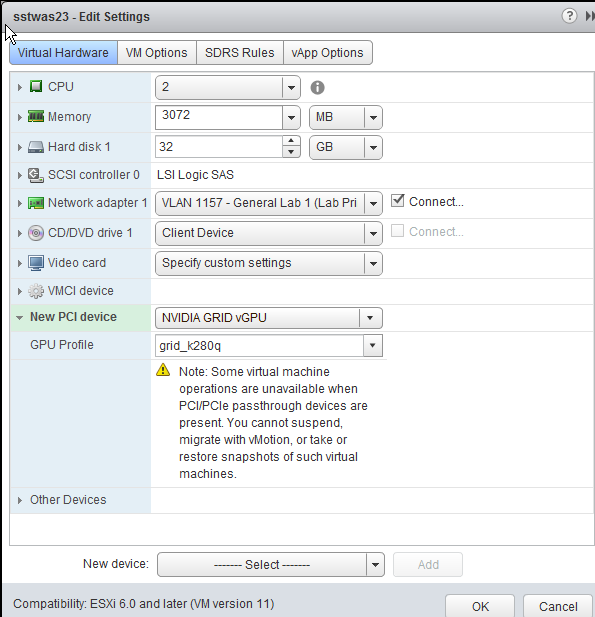
このセクションでは、共有 NVIDIA GRID PCI デバイスを仮想マシンに追加し、その GPU プロファイルを指定する方法について説明します。次の手順は、 サポートされている NVIDIA GRID vGPU ビデオ カードを使用する仮想ワークステーションにのみ必要です。
注: モニターの制限事項
Anyware Graphics Agent は最大 4 台のディスプレイをサポートします。ビデオカードによっては、実際に使用できるディスプレイの数が制限されている場合があります。
開始する前に、次の前提条件が満たされていることを確認してください。
- NVIDIA GRID グラフィックス カードとサポートされているドライバが ESXi ホストにインストールされていること。
- ESXi ホストに VMware Tools をインストールし、仮想マシンに VMware SVGA 3D ドライバをインストールしておきます。
- ワークステーションに対するローカル管理権限を持っていること。
- ワークステーションで OS の電源管理機能を無効にしました。
共有 PCI デバイスを追加し、その GPU プロファイルを指定するには、次のようにします。
-
vSphere Web Client を使用して、[ナビゲータ] リストで仮想マシンを右クリックし、[ パワーオフ ] > [ パワーオフ] を選択します。
-
仮想マシンを右クリックし、[ 設定の編集] を選択します。

-
「新規デバイス」ドロップダウンリストで、「 共有PCIデバイス 」を選択し、「 追加」をクリックします。
-
[ すべてのメモリを予約する] をクリックします。
-
[GPU プロファイル] ドロップダウン リストで、カードのプロファイルを選択します。このプロファイルは、カードで使用可能な仮想ディスプレイヘッド(ディスプレイ)の数を決定します。
-
[ OK] をクリックします。
-
仮想マシンを起動します。
Last updated: Thursday, September 5, 2024