How to use the HP Anyware Licensing Portal
The HP Anyware Licensing Portal provides secure access to the list of licenses and can be used by the company's assigned Account Administrator.
The Account Administrator role can be fulfilled by one central administrator or can be distributed across multiple administrators in an organization. Ideal candidates for this role are individuals responsible for overseeing software purchases and updates across the enterprise. By default, this role is given to the IT contact listed on the order at the time your account is setup.
HP Anyware Licensing Portal
- How to login to the portal?
- How to get an account on the licensing portal?
- How to obtain a list of purchased Management Console Licenses?
- How to obtain a list of purchased HP Anyware Licenses?
- How to obtain a list of all deployed HP Anyware License Servers?
- How to list the pool of licenses associated with a HP Anyware License Server?
- How to add a License to a HP Anyware License Server pool?
- How to remove a license from a HP Anyware License Server pool?
- Viewing Your Account Members
- Adding/Deleting/Updating Members
Related Information
- FAQ - Licensing
- FAQ - Licensing HP Anyware Software
- FAQ - Licensing for PCoIP Management Console
- FAQ - Managing your account on the HP Anyware self-service portal
Answers
How to login to the portal?
Your license portal is here.
If you have been configured for access but forgot your login ID or password, use the link here.
A detailed user manual for the license portal can be found here.
How do I get an account on the licensing portal?
Your account is automatically created when you purchase products. Ongoing purchases across your organization will continue to be consolidated for your account.
If you require access to the portal, contact your license administrator or create a case on the HP Anyware support site. Be prepared to provide a valid activation key/registration code and the name and e-mail address of a contact person who should have access.
What options are available on the licensing portal?
The portal provides a listing of all the licenses
How to obtain a list of purchased Management Console Licenses?
To find all your management console licenses,


(include the asterisks)
3. Press "Search Line Items"
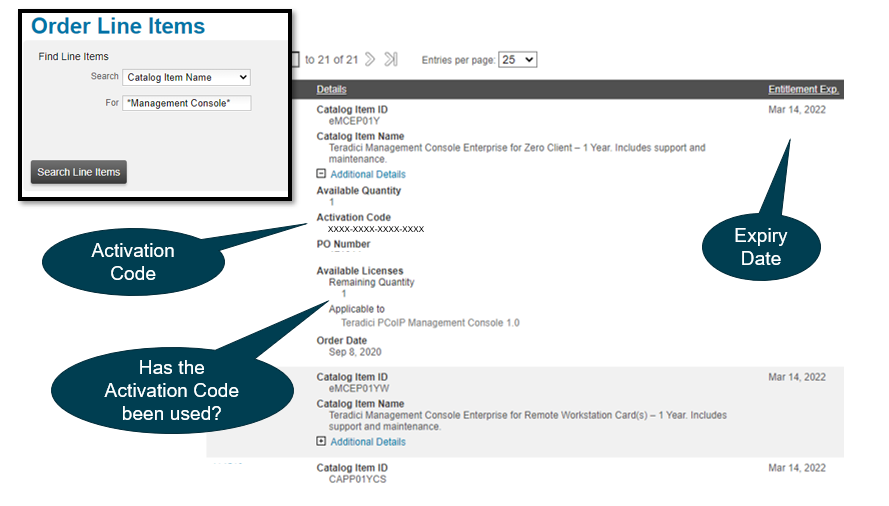
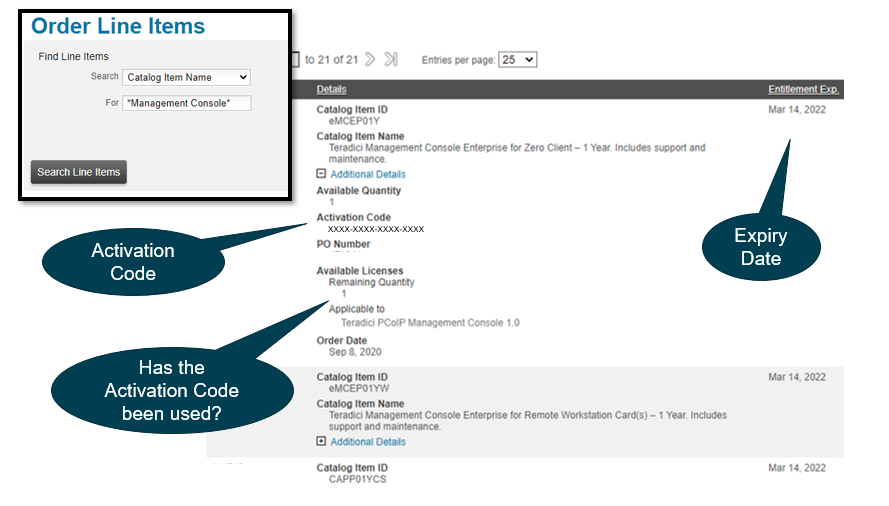
- The Activation code (XXXX-XXXX-XXXX-XXXX) is the "Management Console License Key".
- This key is activated on your Management Console.
- The Available Quantity indicates the number of keys available. (1 per activation code).
- The Remaining Quantity indicates if key has been used (1=key available to activate, 0=already activated on a machine).
- For information on how to activate management console licenses, see:
How to obtain a list of purchased HP Anyware Licenses?
To find all your HP Anyware licenses,


2. In the Find Line Items area, in the Search field
(include the asterisks)
3. Press "Search Line Items"
Expanding the "Additional Details" section will show the "Activation Code" and also if the quantity associated with the code.
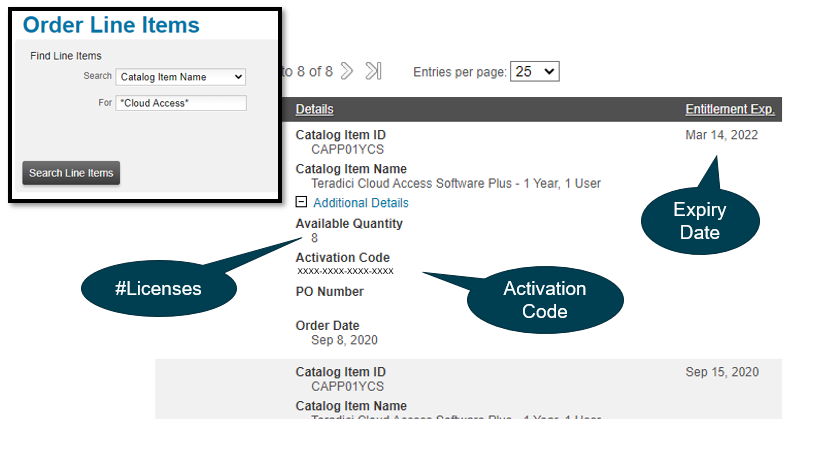
- The Activation code (XXXX-XXXX-XXXX-XXXX) is HP Anyware license key.
- The Available Quantity indicates the number of keys that were purchased.
- To use the license, it needs to be mapped to a HP Anyware License Server.
- For information see:
How to obtain a list of all deployed HP Anyware License Servers?
To find a list of all your HP Anyware license servers,
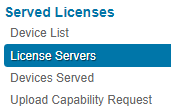
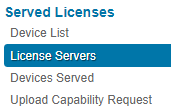
1. Select the License Servers menu option under the Served Licenses sub-heading:
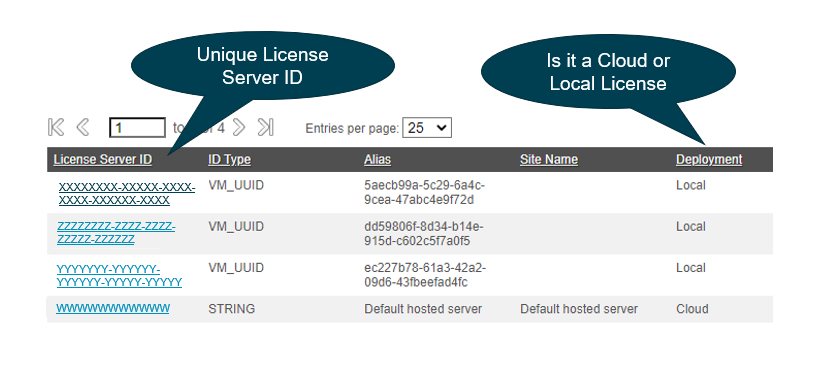
- The "Deployment" column indicates if the license server is a local license server or a cloud license server.
- Under the column "Site Name", the "default hosted server" is using HP Anyware Cloud Licensing.
- When licenses are purchased, they are automatically added to your default cloud license server.
- If you have deployed your own local license server, it will also be listed above. As licenses are purchased, you will need to unmap the licenses from the cloud licenses server and map then to your local license server.
- To see which licenses are being served by which license server, drill down by clicking on the License Server Id.
- For more information on how to activate and use HP Anyware licenses, see:
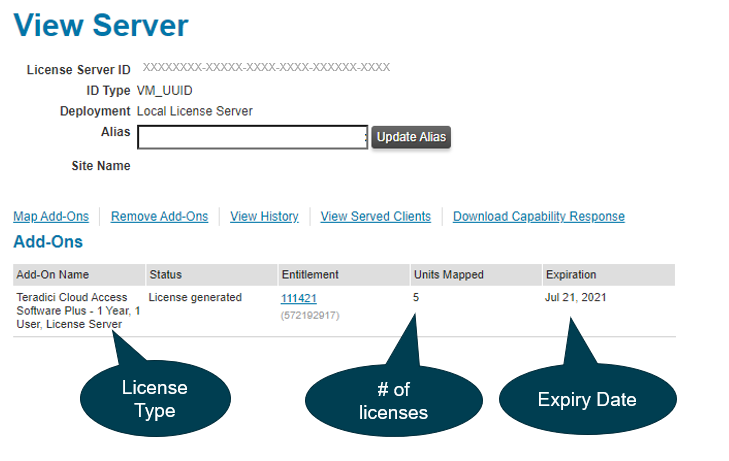
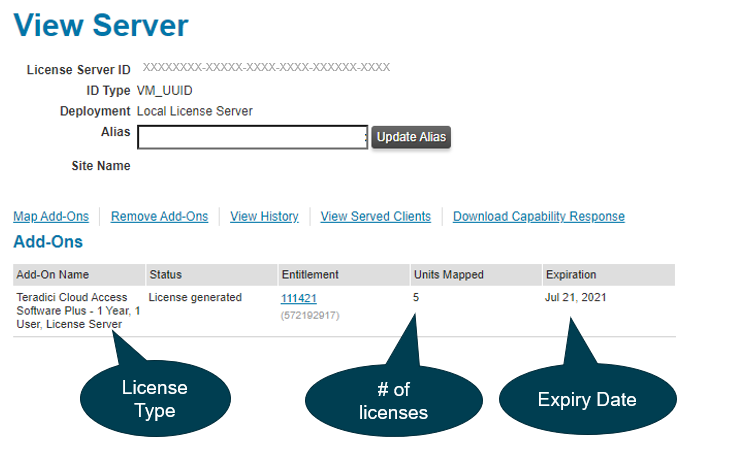
How to list the pool of licenses associated with a HP Anyware License Server?
- List your HP Anyware license servers, by selecting the License Servers menu option
- Click on the license server ID
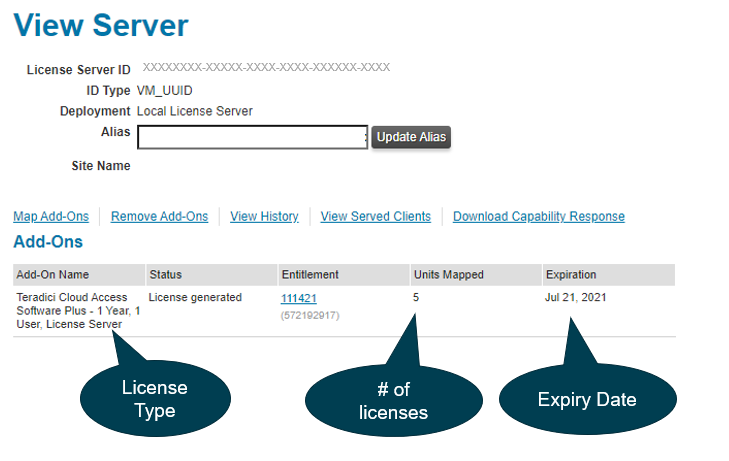
In the above example, the license server has 5 HP Anyware Plus licenses being served and the licenses are valid until July 21, 2021.
How to add a License to a HP Anyware License Server pool?
To add a license to a license server (either cloud or local license server), do the following:
- List your HP Anyware license servers, by selecting the License Servers menu option
- Click on the license server ID that you want
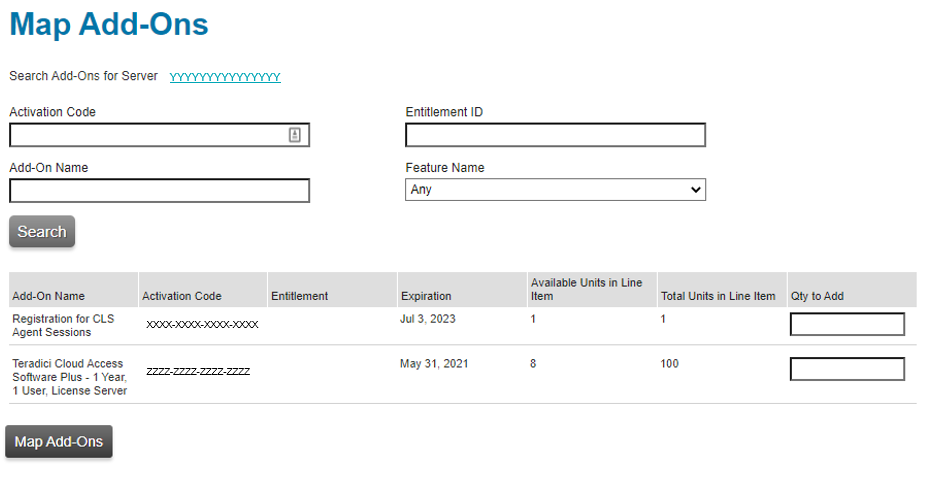
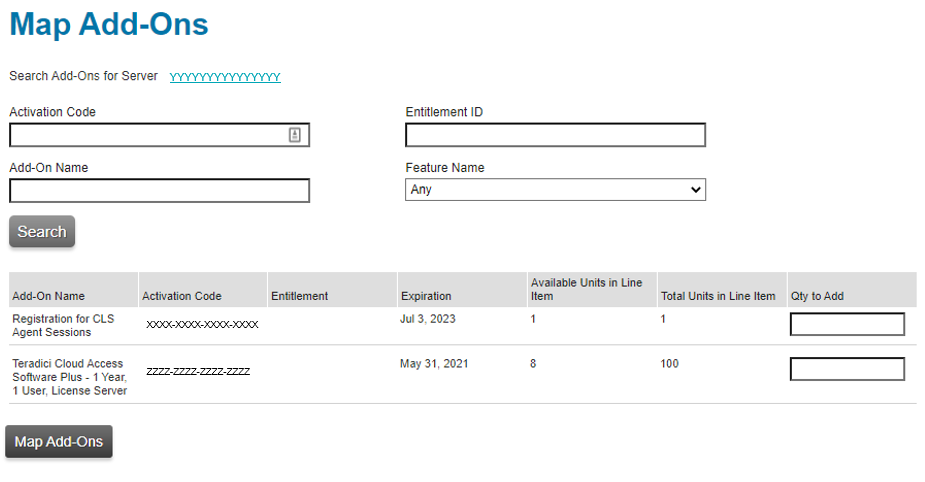
- Click on the "Map Add-Ons" link and you will get a form that will allow you to attach licenses to the pool
- Look for the type of license that you want to add.
- Fill in the "Qty to add" box associated with the license that you want to add and then hit "Map Add-On".
- The license status will show "Copies increasing"
- Select "Download capability Response" link.
- This will download a *.bin file.
- Refresh your browser
- The license should now show "License generated" to indicate that the license server is now serving the newly added licenses.
Note:
- Do not attach "Registration for CLS Agent Session" to a license server.
- If you do not have licenses to attach, then you probably need to first un-map the license from a different license server. See How to remove a license from a HP Anyware License Server pool.
Important:
- If the status of your license shows "Copies increasing", you need to finish step 6 before the license becomes active. For the license to be active it needs to show status "License generated".
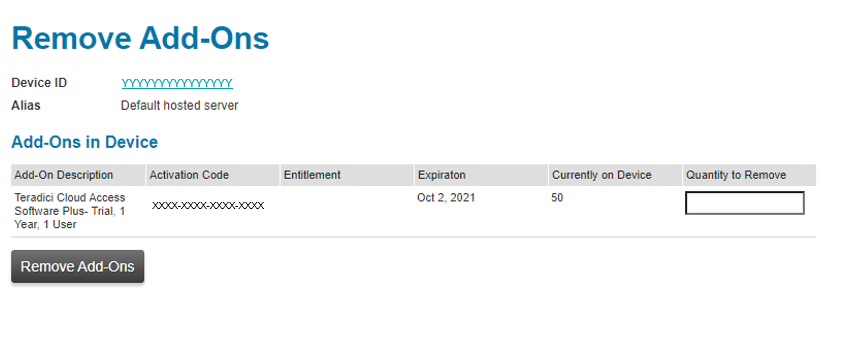
How to remove a license from a HP Anyware License Server pool?
To remove a license to a license server (either cloud or local license server), do the following:
- List your HP Anyware license servers, by selecting the License Servers menu option
- Click on the license server ID that you want
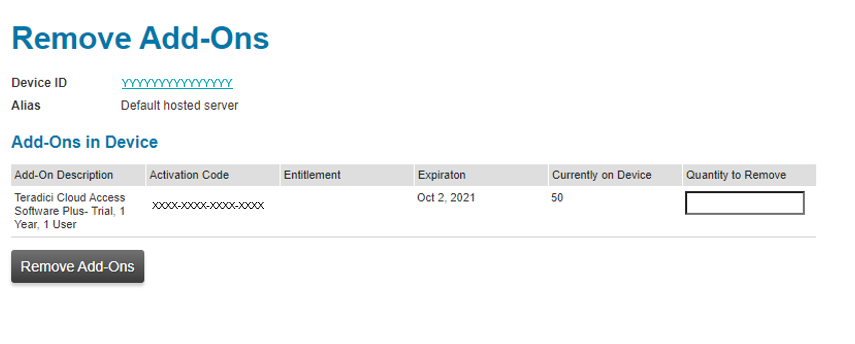
- Click on the "Remove Add-Ons" link and you will get a form that will allow you to remove licenses that are a part of the current pool
- Fill in the "Qty to Remove" box associated with the license that you want to remove
- Select "Remove Add-Ons".
- The license status will show "Copies decreasing".
- Select "Download capability Response" link.
- This will download a *.bin file.
- Refresh your browser
- The license should now show "License generated".
- The "License generated" status indicates that the license server is now serving the newly added licenses.
Viewing Your Account Members
The "Account Members" page allows all members to see the names of other people on your account. In addition, the "Account Members" page is the place where Account Administrators add, delete, and update members, change member privileges, and grant or restrict access to particular products.
Adding/Deleting/Updating Members
If you are an Account Administrator, you can add, delete and update member information for your account.
To add a new member to your account, go to the Account Members page, select either "A New Address" or one of the existing street addresses for your account from the drop down menu at the top of the page, then click on "Go to New Member Form". Be sure to fill in all the fields within the form. If you don't know a piece of information, simply type "unknown". Once you have submitted the form, the new member will be automatically added to your account and will receive a welcome email to this site. If you created a new address for this member, it will automatically be added to the list of addresses for your account so you can use it again later if you add more members at the same location.
To delete an existing member go the Account Members page and click on "Delete Member" next to the member's name. You will be asked to confirm that you really want to cancel the membership for that member.
To update an existing member's information click on the member's name on the "Account Members" page. You will be presented with the profile of the member where you can make the changes and then click on "Submit Membership Info". If you leave the profile page without clicking on "Submit Membership Info" the changes will not be saved.
