Installing the Graphics Agent for macOS
This topic contains instructions for installing the Graphics Agent for macOS. Before you proceed, ensure that you performed the necessary prerequisite tasks.
Note: Firewall Settings
During installation, the macOS agent installer updates the firewall settings on the macOS machine. This ensures that PCoIP traffic is allowed through its firewall.
Installing Using the Installation Package
-
Download the installer to the machine you'll be using as the Anyware host.
-
Run the installer pkg.
-
Click through the installer steps and accept the End User License Agreement. The installation begins.
-
If prompted, allow incoming network connections. This will ensure that
Anyware Agent.app,pcoip-agent, andpcoip-serverare allowed through the firewall. -
Next, provide the license registration code you received from HP.
Important: This step does not apply for License Server users
If you are using a local License Server, do not follow this step; refer to Licensing the Graphics Agent for macOS.
If you are using Anyware Cloud Licensing, open a terminal window and type one of the following commands, depending on whether your host machine is behind a proxy server:
-
If you use a proxy server to access the internet, provide this command (replace
<XXXXXX@YYY-YYYY-YYY>,<PROXY_SERVER_ADDRESS>, and<PROXY_PORT_NUMBER>with your own values):sudo pcoip-register-host --registration-code=<XXXXXX@YYY-YYYY-YYY> --proxy-server=<PROXY_SERVER_ADDRESS> --proxy-port=<PROXY_PORT_NUMBER> -
If your system does not use a proxy server, provide this command (replace
{REGISTRATION_CODE}with your own value):sudo pcoip-register-host --registration-code=<XXXXXX@YYY-YYYY-YYY>
If you are using a License Server, refer to Licensing the Graphics Agent for macOS for licensing instructions.
-
-
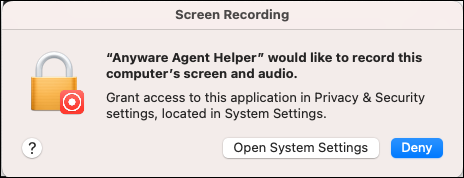
When prompted, grant the required permissions. A prompt will appear requiring you to grant Screen Recording permission to Anyware Agent Helper. The Accessibility prompt appears after you action the Screen Recording prompt.
-
On the Screen Recording prompt that appears, click Open System Settings.

-
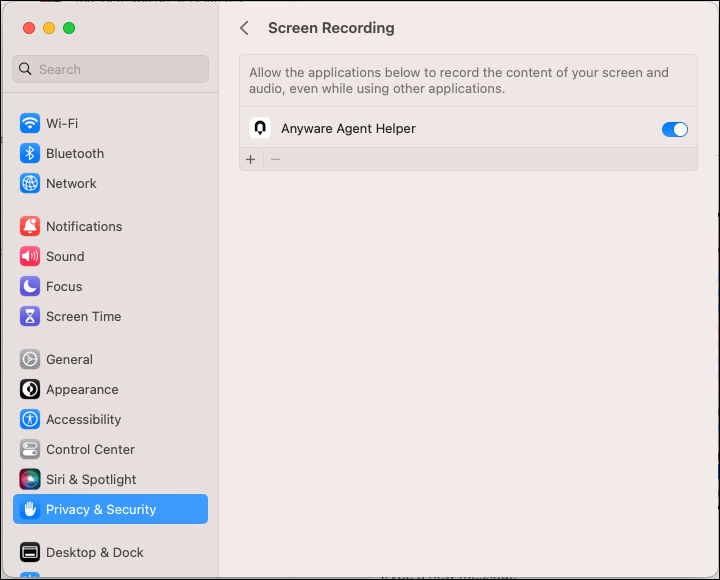
Go to Privacy & Security, and turn on Screen Recording for Anyware Agent Helper.
-
On the Accessibility prompt that appears, click Open System Settings.

-
Go to Privacy & Security, and turn on Accessibility for Anyware Agent Helper.
-
-
Confirm that Anyware Agent Helper has been granted the required permissions:
- Go to System Settings > Privacy & Security > Screen Recording.
- Ensure that screen recording is enabled for Anyware Agent Helper.
- Go to System Settings > Privacy & Security > Accessibility.
- Ensure that accessibility is enabled for Anyware Agent Helper.
-
Restart the machine.
Installing Using the Terminal
Important: Permissions Require GUI
In order to grant Screen Recording and Accessibility permissions, the macOS agent machine must display a graphical user interface. During installation, you must launch Anyware Agent.app to grant user permissions.
-
Download the installer to the machine you'll be using as the Anyware host.
-
Open a terminal window.
-
Run the installer using the following command. Replace {PACKAGE_NAME} with the name of the .pkg file you downloaded:
sudo installer -pkg {PACKAGE_NAME}.pkg -target /The installer will return a
0if successful. A return value of anything other than0indicates a failure. -
Open the Anyware Agent application (Anyware Agent.app), found in /System/Volumes/Data/Applications.
-
Next, provide the license registration code you received from HP Anyware.
Important: This step does not apply for License Server users
If you are using a local License Server, do not follow this step; refer to Licensing the Graphics Agent for macOS.
If you are using Cloud Licensing, type one of the following commands, depending on whether your host machine is behind a proxy server:
-
If you use a proxy server to access the internet, provide this command (replace
<XXXXXX@YYY-YYYY-YYY>,<PROXY_SERVER_ADDRESS>, and<PROXY_PORT_NUMBER>with your own values):sudo pcoip-register-host --registration-code=<XXXXXX@YYY-YYYY-YYY> --proxy-server=<PROXY_SERVER_ADDRESS> --proxy-port=<PROXY_PORT_NUMBER> -
If your system does not use a proxy server, provide this command (replace
<XXXXXX@YYY-YYYY-YYY>with your own registration code value):sudo pcoip-register-host --registration-code={REGISTRATION_CODE}
If you are using a License Server, refer to Licensing the Graphics Agent for macOS for licensing instructions.
-
-
Launch Anyware Agent.app to grant the required permissions. A prompt will appear requiring you to grant screen recording permission to Anyware Agent Helper. The Accessibility prompt appears after you action the Screen Recording prompt.
-
On the Screen Recording prompt that appears, click Open System Settings.

-
Go to Privacy & Security, and turn on Screen Recording for Anyware Agent Helper.

-
On the Accessibility prompt that appears, click Open System Settings.

-
Go to Privacy & Security, and turn on Accessibility for Anyware Agent Helper.

-
-
Confirm that Anyware Agent Helper has been granted the required permissions:
- Go to System Settings > Privacy & Security > Screen Recording.
- Ensure that screen recording is enabled for Anyware Agent Helper.
- Go to System Settings > Privacy & Security > Accessibility.
- Ensure that accessibility is enabled for Anyware Agent Helper.
-
Restart the machine.
If Prompts Do Not Appear
If you are not prompted for permissions during installation, launch Anyware Agent.app to prompt for privacy permissions to Anyware Agent Helper. Anyware Agent.app is found at the following location: /System/Volumes/Data/Applications. For instructions, see Screen Recording and Accessibility permissions. Once the permissions have been granted, you do not need to launch Anyware Agent.app again.
Uninstalling the Graphics Agent for macOS
Deleting User Granted Permissions
User granted permissions are not deleted by the uninstaller. You must delete these permissions BEFORE uninstalling the macOS agent.
-
Run the following commands to delete the user granted permissions:
sudo tccutil reset ScreenCapture com.teradici.pcoip-user-agent;sudo tccutil reset Accessibility com.teradici.pcoip-user-agent; -
Uninstall the Graphics Agent by running the following command:
sudo /Library/Application\ Support/Teradici/pcoip/uninstaller